
Peanut Butter Brownies

Decadent flourless brownies with a peanut butter ribbon and silky ganache—fudgy, chewy, naturally gluten-free, and impossibly easy to make.
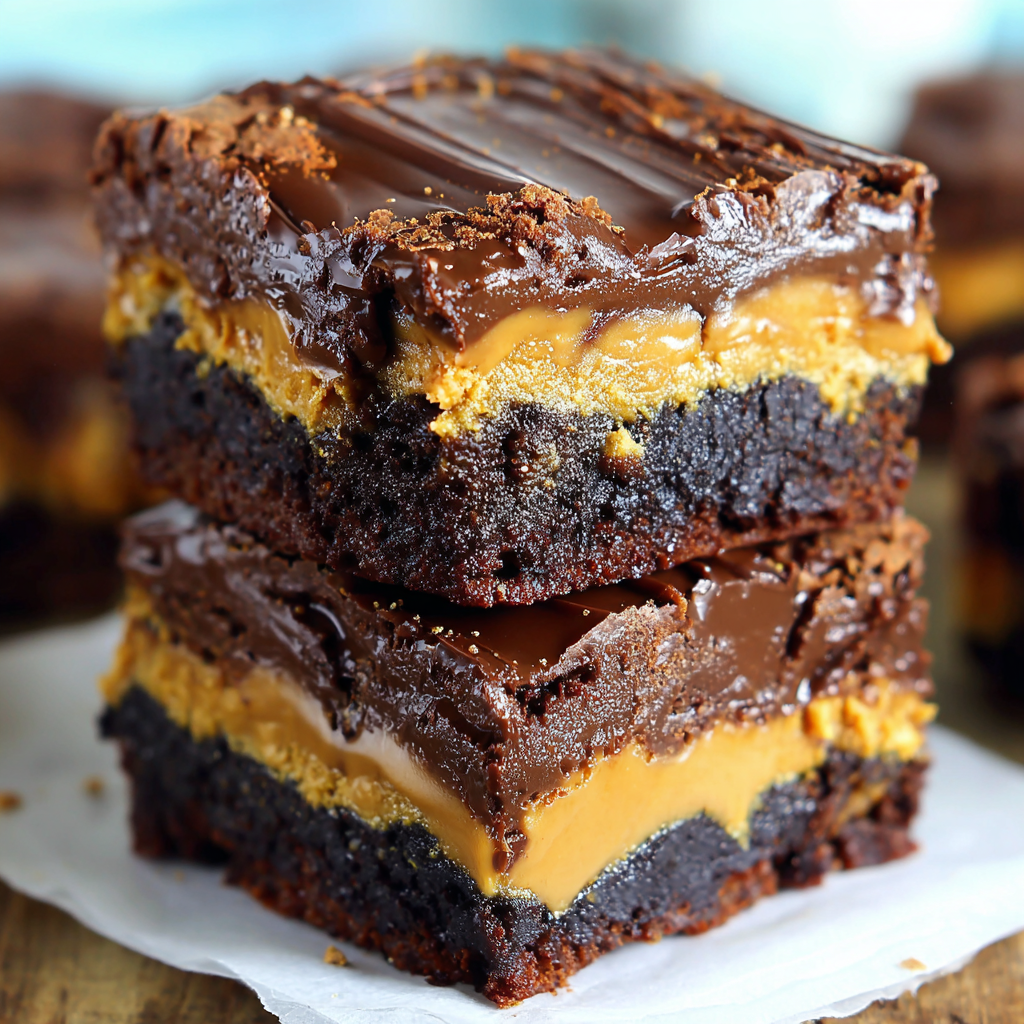
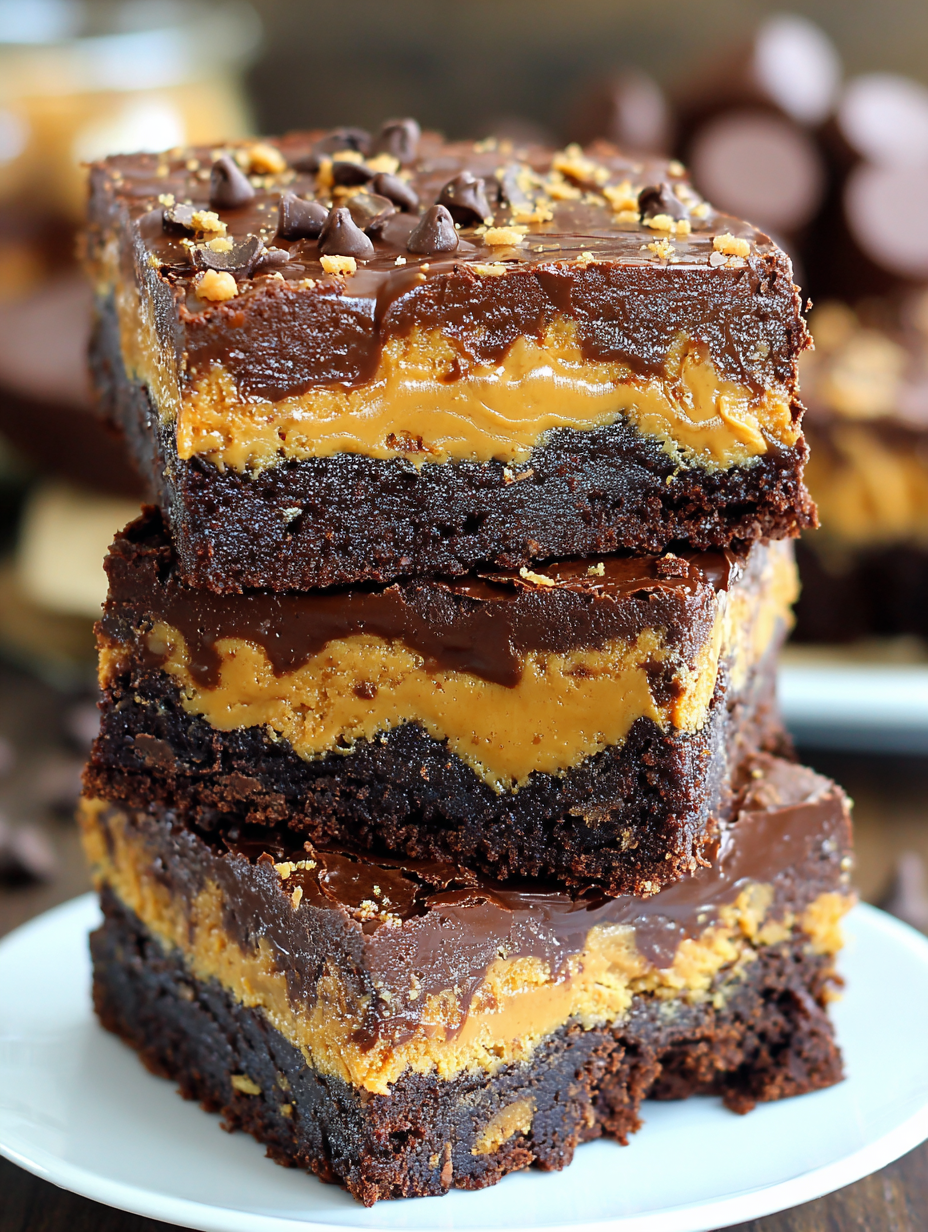
This peanut butter brownies recipe is my family’s answer to every chocolate emergency. I first made these on a rainy Sunday when I needed something indulgent but didn't want to pull out a dozen mixing bowls or fuss with flour. The result was immediate—rich, fudgy, and chewy brownies with a salty-sweet ribbon of peanut butter in the middle and a glossy ganache crown. They quickly became the dessert I bring to potlucks, the sweet treat my kids request for school celebrations, and the ultimate reward after a long week.
The texture is what makes these exceptional: dense, moist, and almost brownie-truffle-like thanks to melted chocolate and a little cornstarch in place of flour. The peanut butter layer is creamy and slightly sweet, providing a counterpoint to the bittersweet base. Topped with a ganache made from high-quality bittersweet chocolate and cream, these bars satisfy the deepest chocolate cravings without complicated techniques. Best of all, they’re made without flour, naturally gluten-free, and simple enough to toss together in under an hour. You don’t need a stand mixer—just a few bowls, a spatula, and a little patience while the chocolate melts and sets.
Why You'll Love This Recipe
- Fudgy, flourless base delivers a dense, brownie-truffle texture that feels luxurious but is straightforward to prepare.
- Peanut butter ribbon adds salty-sweet contrast, turning ordinary bars into showstoppers without extra effort.
- Takes about 45 minutes from start to finish: 15 minutes prep, roughly 30 minutes baking—great for last-minute gatherings.
- Uses pantry staples like chocolate chips, cocoa, and cornstarch; no special flours required so it’s naturally gluten-free.
- No mixer needed—melting chocolate in a bowl and folding ingredients by hand keeps cleanup minimal and technique accessible.
- Make-ahead friendly: chill to set the ganache and transport easily for potlucks or picnics when stored in a rigid container.
Personally, the first time I let the ganache set and then watched my kids’ eyes widen at that first bite was priceless. Every time I serve these, someone asks for the recipe and then tells me they made them for a birthday or took them to a bake sale. They are the kind of dessert that sparks compliments and requests for seconds.
Ingredients
- Peanut Butter Filling: 3/4 cup creamy peanut butter. Use a high-quality, well-stirred natural brand for a bright nutty flavor; if your peanut butter is very oily, stir it until homogeneous before measuring.
- Granulated Sugar (filling): 1/2 cup. Adds structure and a slight crisp edge to the filling—regular white sugar is fine.
- Egg (filling): 1 large egg, room temperature. Room-temperature eggs incorporate more smoothly into batters and help the filling set without cracking.
- Semi-sweet or Bittersweet Chocolate Chips: 12 ounces for the base. I prefer a 60–70% cacao bittersweet chip for depth; chips melt predictably in the microwave.
- Unsalted Butter: 6 tablespoons, cut into cubes. Use unsalted so you can control seasoning; if only salted is available, reduce added salt slightly.
- Sugar (brownie base): 3/4 cup granulated sugar. This provides sweetness and helps the exterior set while the interior stays gooey.
- Vanilla Extract: 1 teaspoon. A touch of vanilla brightens the chocolate notes.
- Eggs (base): 3 large eggs, room temperature. Eggs provide structure and richness for the dense crumb.
- Unsweetened Cocoa Powder: 1/4 cup, sifted. Use Dutch-processed for deeper chocolate flavor or natural for acidity and brightness.
- Cornstarch: 1/3 cup. Acts as a flour substitute to give structure without making the bars cakey.
- Salt: 1/2 teaspoon. Balances sweetness and enhances chocolate flavor—fine sea salt is ideal.
- Mini Semi-sweet Chocolate Chips: 1 cup. These add pockets of melty chocolate and texture contrast.
- Ganache: 10 ounces bittersweet chocolate, finely chopped, and 1/2 cup heavy whipping cream. Choose a rich chocolate for a glossy, stable top.
Instructions
Preheat and Prepare Pan: Preheat oven to 350F. Lightly spray a 9-inch square pan and line it with parchment paper, leaving a 2-inch overhang on two sides to lift the bars easily after chilling. This helps produce clean edges when slicing. Make the Peanut Butter Filling: In a medium bowl, whisk together 3/4 cup peanut butter, 1/2 cup granulated sugar, and 1 room-temperature egg until entirely smooth. Scrape the sides and mix until glossy; set aside at room temperature while you make the base. Melt Chocolate and Butter: Place 12 oz chocolate chips and 6 tbsp cubed butter in a large microwave-safe bowl. Microwave on high for 30 seconds, stir, then repeat in 15–30 second bursts until smooth. Stir thoroughly so residual heat melts any remaining pieces; avoid overheating or the chocolate will seize. Incorporate Sugar, Vanilla, and Eggs: Stir 3/4 cup sugar and 1 tsp vanilla into the melted chocolate until smooth. Add eggs one at a time, stirring well after each addition so the mixture becomes glossy and slightly thickened—this develops the structure that yields fudgy bars. Blend Dry Ingredients: Whisk together 1/4 cup cocoa powder, 1/3 cup cornstarch, and 1/2 tsp salt in a small bowl. Add the dry mix to the chocolate mixture and stir vigorously for 60–90 seconds until the batter pulls away from the bowl edges and feels cohesive; this is the visual cue that the cornstarch has hydrated and the batter is ready. Fold in Mini Chips and Layer: Fold in 1 cup mini chocolate chips. Pour about two-thirds of the batter into the prepared pan and smooth it with an offset spatula to an even layer. Add Peanut Butter and Top: Drop small spoonfuls of the peanut butter filling across the batter in a grid. Spoon the remaining batter over the dollops—don’t worry about perfection; use the back of a spoon to gently cover most of the peanut butter spots. Swirls are fine and attractive. Bake and Test for Doneness: Bake 33–37 minutes. Start checking at 30 minutes: an inserted toothpick should come out with a few moist crumbs clinging—not wet batter. Overbaking will dry the bars; underbaked brownies will collapse when cooled. Cool Completely: Allow the pan to cool on a wire rack until room temperature. For cleaner ganache topping and sharper slices, chill the cooled bars in the refrigerator for 30–60 minutes before pouring the ganache. Make Ganache: Place 10 oz chopped bittersweet chocolate in a heatproof bowl. Heat 1/2 cup heavy cream until scalding (steaming with small bubbles at the edge), pour over the chocolate, and let sit 5 minutes. Stir gently until glossy and smooth. If needed, microwave in 15-second bursts, stirring in between, until fully emulsified. Top and Set: Pour ganache over the chilled bars and spread evenly with an offset spatula. Refrigerate until ganache is fully set, at least 45 minutes, then use the parchment overhang to lift the slab and cut into 36 bars with a sharp knife warmed under hot water and wiped dry between cuts. Store: Keep in an airtight container in the refrigerator for up to 3 days. For longer storage, freeze individual pieces between sheets of parchment and thaw in the fridge before serving.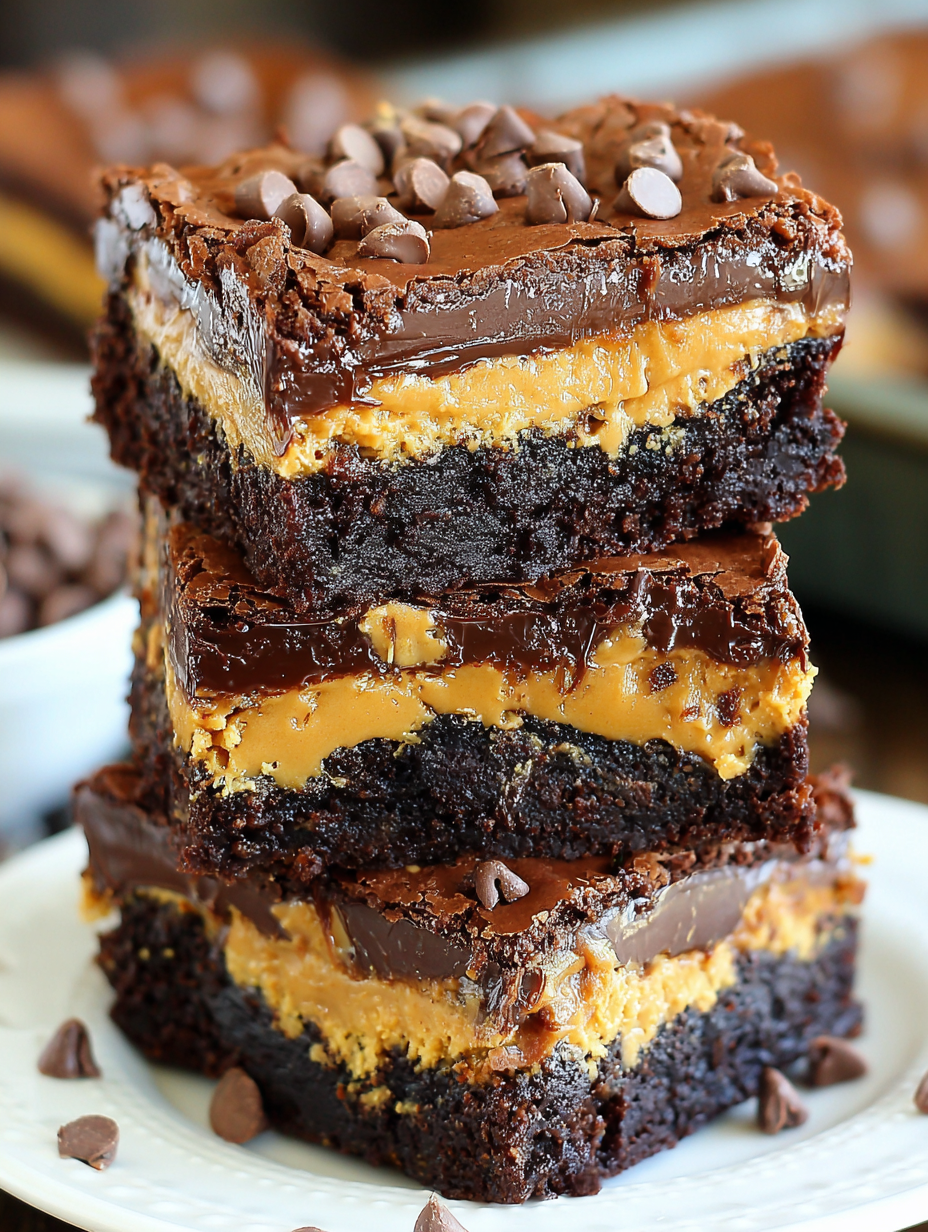
You Must Know
- These bars are naturally gluten-free because they contain no wheat flour; corn starch and cocoa create structure while keeping a dense texture.
- They keep best refrigerated for up to 3 days; ganache and peanut butter filling firm up when chilled, resulting in cleaner slices.
- Freeze for up to 3 months in a rigid container with parchment between layers—thaw in the fridge overnight before serving.
- High in calories and fat—each bar is rich and should be served in small portions for sharing or special treats.
My favorite part is how forgiving this method is: if the peanut butter isn’t spread perfectly, it still tastes amazing. The first time I made these for a family reunion, cousins who claimed not to like peanut butter secretly grabbed extras. That kind of reaction keeps me making them year after year.
Storage Tips
Store cooled bars in an airtight container in the refrigerator to keep the ganache glossy and the filling firm; they last up to three days. For transport, use a rigid container and separate layers with parchment to avoid smudging the ganache. If you want make-ahead convenience, freeze sliced bars on a sheet pan until solid, then stack with parchment between layers in a freezer-safe container for up to three months. Thaw overnight in the fridge to preserve texture. When reheating slightly, allow bars to come to room temperature for 20 minutes so the ganache softens without melting completely.
Ingredient Substitutions
If you prefer a different nut flavor, swap peanut butter for almond or cashew butter using a 1:1 ratio; texture will be similar though flavor changes. For a dairy-free version, use a dairy-free butter and substitute coconut cream for heavy cream in the ganache—note that coconut will add a slight flavor. If you need lower sugar, reduce the sugar in the base by up to 25% but expect a less glossy surface and a firmer texture. Use dairy-free chocolate chips labeled vegan to keep it plant-based, but the bars will no longer be vegetarian in the traditional sense if you replace eggs—use a commercially tested egg replacer if strict vegan compliance is needed.
Serving Suggestions
Serve chilled or at room temperature with a dusting of cocoa or flaky sea salt to highlight the peanut butter contrast. Pair with a dollop of whipped cream or a scoop of vanilla ice cream for temperature contrast. For parties, arrange squares on a platter with fresh berries and mint for a pop of color. These bars also work well for gifting—wrap individual squares in parchment and tie with twine for a homemade treat.
Cultural Background
Rich chocolate and nut pairings are a classic in American baking, and the combination of peanut butter and chocolate has roots in home-kitchen inventiveness. Peanut butter became widely popular in the U.S. in the early 20th century and quickly evolved from sandwich spread to ingredient in confections. These bars reflect that heritage—simple pantry staples transformed into something decadent, echoing the tradition of accessible comfort baking that characterizes much of American dessert culture.
Seasonal Adaptations
In cooler months, add a pinch of cinnamon or a teaspoon of espresso powder to the base to amplify chocolate depth. For summer gatherings, cut smaller squares and serve slightly chilled to keep them firm in warm weather. Around holidays, stir in 1/2 cup chopped roasted peanuts for crunch or swirl in a tablespoon of salted caramel into the peanut butter filling for a festive twist. Swap the ganache for a salted peanut glaze for a lighter top if preferred.
Meal Prep Tips
For batch prep: double the recipe and bake two pans, stacking finished layers with parchment between them for freezer storage. Label with date and freeze for up to three months. When assembling, let the ganache set in the fridge while you clean up; cutting is much easier after chilling. Use a warm, dry knife wiped between cuts for neat squares. These bars are ideal for making ahead for events—prepare them the day before so flavors meld and ganache firms up for professional-looking slices.
In short, these peanut butter brownies are the kind of make-ahead, crowd-pleasing dessert that earns repeat requests. They’re simple enough for a weeknight treat yet impressive for celebrations—go ahead, make a pan and watch them disappear.
Pro Tips
Warm your knife under hot water and wipe it dry between cuts for clean slices.
Chill the pan before pouring ganache to prevent the chocolate from seeping into the base.
Use room-temperature eggs for smoother emulsification and better texture.
If the ganache seizes, add a teaspoon of warm cream and stir until smooth.
This nourishing peanut butter brownies recipe is sure to be a staple in your kitchen. Enjoy every moist, high protein slice — it is perfect for breakfast or as a wholesome snack any time.
Tags
Peanut Butter Brownies
This Peanut Butter Brownies recipe makes perfectly juicy, tender, and flavorful steak every time! Serve with potatoes and a side salad for an unforgettable dinner in under 30 minutes.
Ingredients
Peanut Butter Filling
Brownies
Ganache
Instructions
Preheat and Prepare
Preheat oven to 350F. Lightly spray a 9-inch square pan and line with parchment paper leaving an overhang for easy removal.
Make Peanut Butter Filling
Combine 3/4 cup peanut butter, 1/2 cup sugar, and 1 egg in a medium bowl. Mix until smooth and set aside.
Melt Chocolate and Butter
Melt 12 oz chocolate chips and 6 tbsp butter in 30-second microwave increments, stirring between each until smooth.
Add Sugar, Vanilla, and Eggs
Stir in 3/4 cup sugar and 1 tsp vanilla. Add eggs one at a time, stirring until the mixture is glossy and combined.
Mix Dry Ingredients
Whisk 1/4 cup cocoa, 1/3 cup cornstarch, and 1/2 tsp salt. Add to wet mixture and stir vigorously until smooth and batter pulls away from the bowl.
Fold Mini Chips and Layer
Stir in 1 cup mini chips. Pour two-thirds of batter into the prepared pan and smooth the top.
Add Peanut Butter and Top
Drop spoonfuls of the peanut butter mixture across the batter, then top with remaining batter and smooth roughly.
Bake and Cool
Bake 33–37 minutes until a toothpick comes out with a few moist crumbs. Cool completely on a rack and chill briefly before ganache.
Make Ganache
Heat 1/2 cup heavy cream and pour over 10 oz chopped bittersweet chocolate. Let sit 5 minutes then stir until smooth; warm briefly if necessary.
Top, Set, and Slice
Pour ganache over cooled bars, spread, and refrigerate until set. Use parchment overhang to lift and cut into 36 squares.
Last Step: Please leave a rating and comment letting us know how you liked this recipe! This helps our business to thrive and continue providing free, high-quality recipes for you.
Nutrition
Did You Make This?
Leave a comment & rating below or tag
@velvetyum on social media!
Categories:
You might also like...

Cheesy Zucchini Rollatini
Tender grilled zucchini rolled with a basil-kissed ricotta filling, nestled in marinara, and baked until the mozzarella bubbles and turns golden.

Crispy Zucchini and Squash
Golden, garlicky rounds with a deep-fried crunch made lighter in the air fryer. A fast, vitamin-packed side everyone devours.

Chicken Parmesan Meatballs
Tender chicken meatballs simmered in marinara, finished with melted mozzarella and basil for cozy, weeknight Italian comfort in every bite.
Did You Make This?
Leave a comment & rating below or tag @velvetyum on social media!
Rate This Recipe
Share This Recipe
Enjoyed this recipe? Share it with friends and family, and don't forget to leave a review!
Comments (1)
This recipe looks amazing! Can't wait to try it.
Comments are stored locally in your browser. Server comments are displayed alongside your local comments.

Hi, I'm Emma!
What's Popular

30-Minute Meals!
Join to receive our email series which contains a round-up of some of our quick and easy family favorite recipes.