
>>

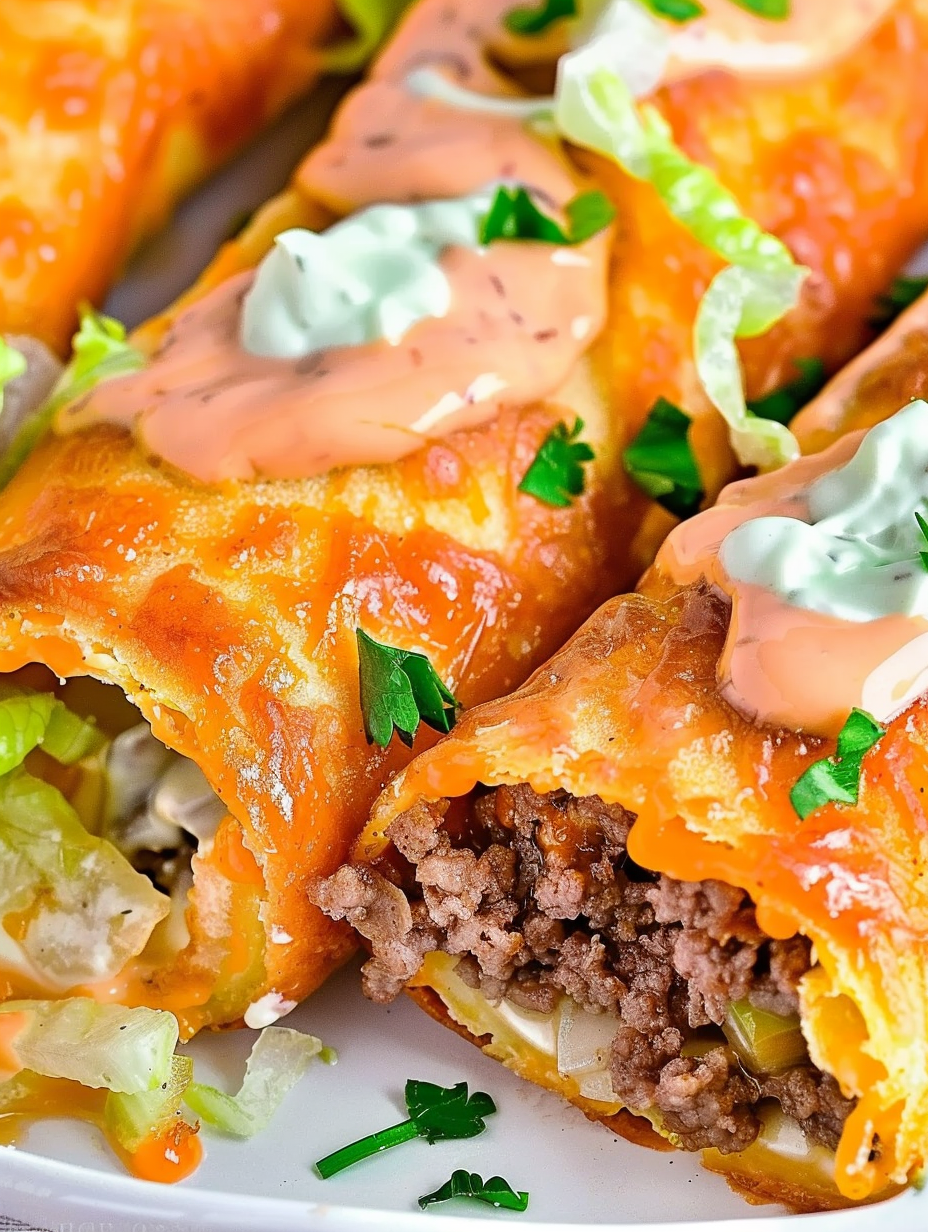
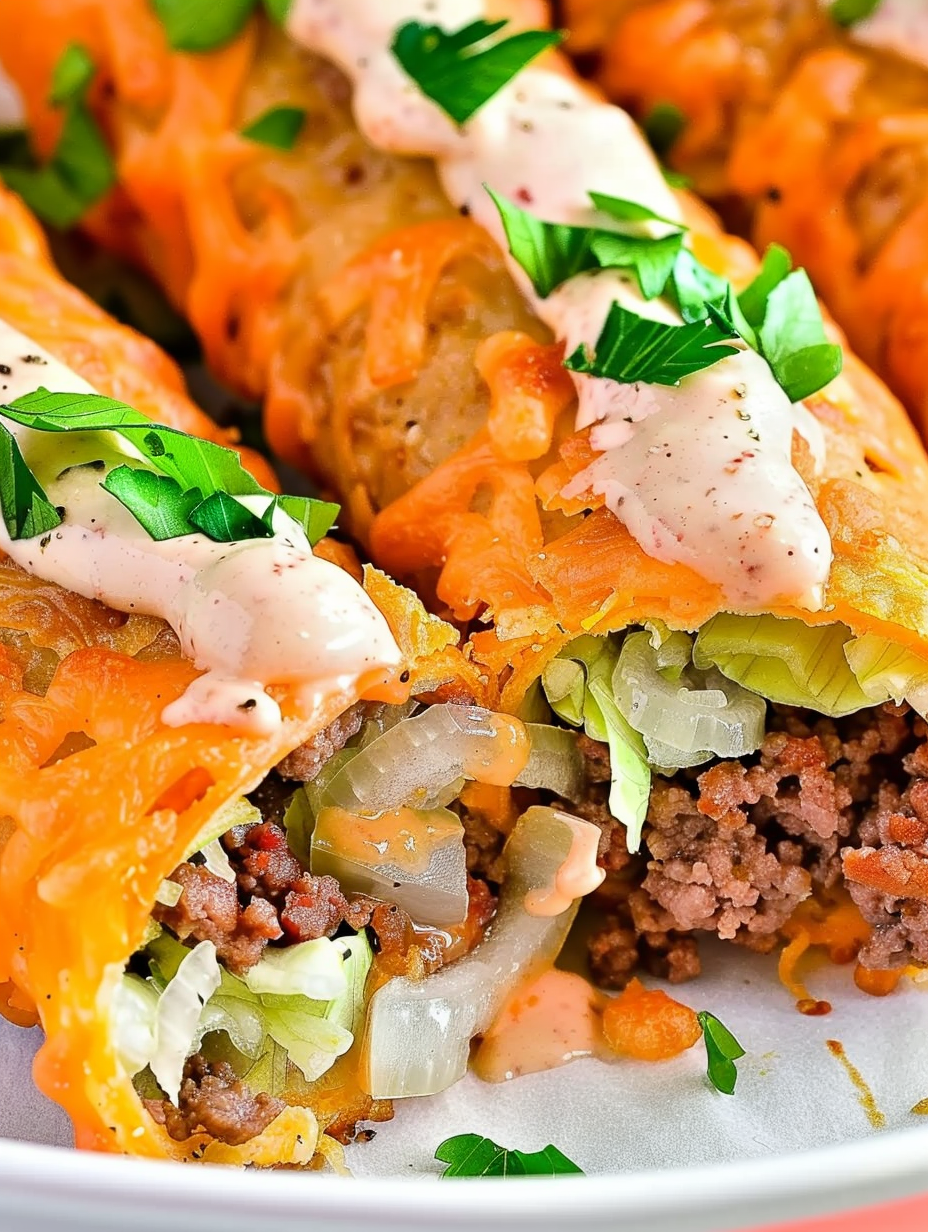
Crispy cheese roll-ups filled with seasoned beef, shredded lettuce, pickles and a creamy keto Big Mac sauce—perfect for a low-carb lunch or appetizer.

This recipe is all about the sauce. The first time I layered that tangy, creamy keto Big Mac sauce onto a warm, just-baked cheese crisp and folded it around juicy seasoned beef, I knew I had something special. I discovered this combination while I was adapting takeout favorites to a low-carb lifestyle: I wanted the nostalgia of a classic burger without the bun. The result is a playful, handheld bite that hits all the familiar notes—savory beef, bright pickle, crunchy lettuce and that slightly sweet, tang-forward sauce—without the carbs. It has become my go-to when friends drop by and ask for something indulgent but keto-friendly.
These roll-ups are fast to make, satisfyingly textural and endlessly adaptable. The cheese forms a crisp shell that stays sturdy as the filling cools and sets, and the simple sauce ties everything together. I often make a double batch of meat for easy assembly later in the week; they hold up well for a quick lunch or as party bites at a casual gathering. Whether you are feeding a group or packing them for a solo meal, the combination of warm, crispy cheese and cool, creamy sauce creates a contrast that everyone notices and loves.
I remember serving these at a small game-night gathering; even guests who were skeptical about the lack of a bun reached for seconds. The crunchy cheese exterior paired with the cold lettuce and zippy sauce created that satisfying contrast you want from a burger, and the pickles cut through the richness beautifully. It made me appreciate how small, thoughtful swaps can preserve the pleasure of a classic while honoring dietary goals.
My favorite part is how these little rolls feel indulgent yet simple. The first time I made them for a weekday lunch, my partner insisted I write down the steps because he wanted them again the next day. They travel well packed upright in a container and reheat for a few seconds under a broiler if you prefer them warmed. For parties I will bake extra shells and set out bowls of warm meat, sauce and lettuce for a ‘build your own’ station—guests love the interactive element.
Store leftover fillings and sauce in airtight containers in the refrigerator for up to 3 days. Keep assembled roll-ups in a single layer in the fridge for up to 24 hours to avoid the cheese shells softening from trapped moisture. For longer storage, freeze the cooked meat mixture in a freezer-safe bag or container for up to 3 months; thaw overnight in the refrigerator before reheating. To re-crisp cheese shells, place assembled roll-ups under a hot broiler for 30 to 60 seconds or warm in a 350 degrees Fahrenheit oven for 5 minutes, watching closely so the cheese does not over-brown.
If you prefer a milder shell, swap half the cheddar for Monterey Jack or Colby. To make the protein leaner, use ground turkey or chicken but add 1 tablespoon butter to the skillet while cooking to replace flavor lost from fat. For a dairy-free adaptation, use a plant-based cheese that melts crisply—brands vary in performance so test one batch first. If Worcestershire is a concern for dietary restrictions, a dash of tamari and a squeeze of lemon can approximate the tangy umami.
Serve these with a simple side salad of mixed greens dressed in lemon vinaigrette or with a small bowl of extra keto Big Mac sauce for dunking. For entertaining, present them on a platter garnished with finely chopped dill and extra pickle slices. They pair nicely with crisp raw vegetables like cucumber ribbons or radish slices, which add textural contrast and freshness. Consider small toothpicks to help hold larger roll-ups together if serving buffet-style.
These roll-ups are a riff on the American fast-food classic, reinterpreted through a contemporary low-carb lens. The idea of recreating iconic flavors without traditional starches is common in keto and low-carb communities; replacing bread with cheese crisps is a technique that has emerged in home kitchens and online recipe forums. The flavour components—beef, pickles, tangy sauce and lettuce—echo the original sandwich while celebrating the portability of small, composed bites found in American party cuisine.
In summer, add fresh tomato slices or swap iceberg for butter lettuce for a lighter note. In winter, fold in a teaspoon of smoked paprika or a pinch of cayenne to the meat for warmth, and top the roll-ups with a quick-pickled red onion to add brightness. For holiday gatherings, make smaller canapé-sized versions using 1 tablespoon of cheese per disc and serve on decorative platters for an appetizer spread that still honors the Big Mac profile.
Prepare the meat mixture and sauce up to 48 hours in advance to save time. Keep the lettuce shredded and stored in a paper-towel-lined container to maintain crispness. When ready to eat, bake cheese discs and assemble quickly; this approach keeps the shells at peak texture. For packed lunches, place a paper liner between stacked roll-ups to prevent sticking and condensation.
There is a special satisfaction in making a nostalgic flavor feel fresh and intentional. These roll-ups are proof that small technique changes—like crisping cheese into a shell—can transform a familiar taste into something exciting for everyday low-carb eating. Give them a try and make them your own with the variations suggested above.
Use freshly shredded cheese rather than pre-shredded for a smoother, more uniform crisp.
Work quickly when the cheese comes out of the oven; it is easiest to roll while still pliable.
Pat the meat mixture dry if it releases too much liquid after cooking to avoid soggy shells.
Spread a thin line of sauce instead of a large dollop to prevent leakage while rolling.
This nourishing keto big mac roll-ups recipe is sure to be a staple in your kitchen. Enjoy every moist, high protein slice — it is perfect for breakfast or as a wholesome snack any time.
Yes. The cooked meat and sauce can be refrigerated for up to 3 days. Assemble the cheese shells just before serving for best texture.
They keep best refrigerated for 24 hours; freezing assembled roll-ups is not recommended because the cheese shell can become soggy upon thawing.
This Keto Big Mac Roll-Ups recipe makes perfectly juicy, tender, and flavorful steak every time! Serve with potatoes and a side salad for an unforgettable dinner in under 30 minutes.
Place ground beef and finely chopped onion in a skillet over medium-high heat. Break up meat with a spatula and cook 6 to 8 minutes until browned and onions are translucent. Drain excess grease.
Return the drained meat to the pan and stir in 2 tablespoons dill pickle relish, 1/2 teaspoon Worcestershire sauce and salt and pepper to taste. Saute 1 to 2 minutes to combine.
Whisk together 1/3 cup mayonnaise, 1 tablespoon dill pickle relish, 1 tablespoon sugar-free ketchup and 1 teaspoon Swerve until smooth. Taste and adjust for brightness.
Preheat the oven to 400 degrees Fahrenheit. On a parchment-lined baking sheet, place 1/4 cup shredded cheddar per round to form 3-4 inch circles. Bake 6 to 8 minutes until edges brown and crisp.
Immediately after removing cheese circles from the oven, place a line of sauce down the center, top with shredded lettuce and a spoonful of the meat mixture. Quickly roll the cheese around the filling and allow to cool and set for 3 to 5 minutes.
Last Step: Please leave a rating and comment letting us know how you liked this recipe! This helps our business to thrive and continue providing free, high-quality recipes for you.
Leave a comment & rating below or tag
@velvetyum on social media!

Tender grilled zucchini rolled with a basil-kissed ricotta filling, nestled in marinara, and baked until the mozzarella bubbles and turns golden.

Golden, garlicky rounds with a deep-fried crunch made lighter in the air fryer. A fast, vitamin-packed side everyone devours.

Tender chicken meatballs simmered in marinara, finished with melted mozzarella and basil for cozy, weeknight Italian comfort in every bite.
Leave a comment & rating below or tag @velvetyum on social media!
Enjoyed this recipe? Share it with friends and family, and don't forget to leave a review!
This recipe looks amazing! Can't wait to try it.
Comments are stored locally in your browser. Server comments are displayed alongside your local comments.

Join to receive our email series which contains a round-up of some of our quick and easy family favorite recipes.
