
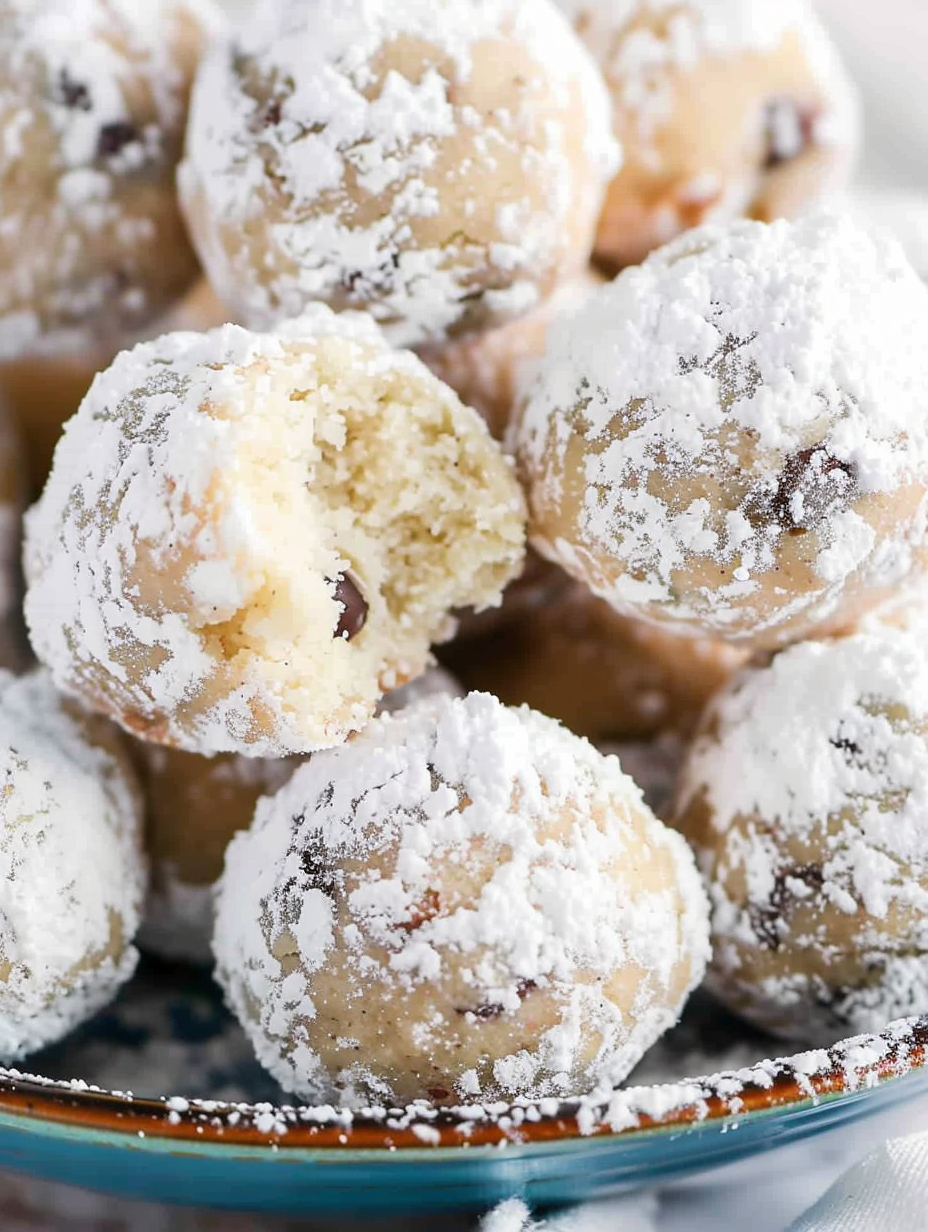
Chocolate Chip Snowball Cookies

Soft, buttery snowball cookies studded with mini chocolate chips — a nut-free holiday favorite that's easy to make, perfect for cookie swaps, and irresistible to kids and adults alike.
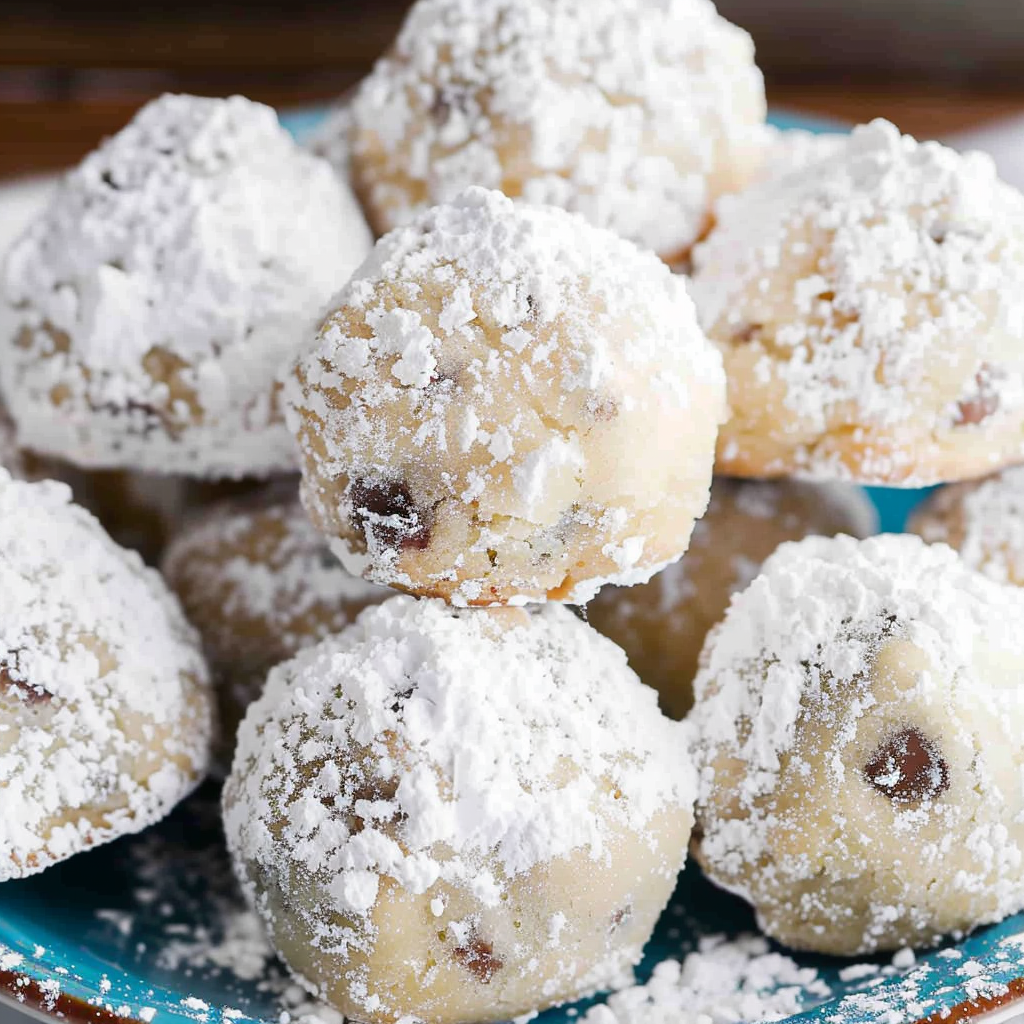
This is my favorite version of a holiday classic: snowball cookies made without nuts and studded with mini chocolate chips for a playful twist. I first adapted this recipe after a friend asked for a nut-free treat for a school cookie exchange. The result was an instant hit. The cookies are tender and crumbly like traditional snowballs, but the tiny chocolate chips add bursts of familiar sweetness and a slight chew that keeps every bite interesting.
I remember baking a double batch one December afternoon while holiday music played in the background and my kids took turns sneaking warm cookies off the cooling rack. The contrast of the cool powdered sugar against the warm, buttery cookie is one of those small, memorable things that makes holiday baking feel special. These cookies are forgiving, quick to assemble, and they travel well — perfect for cookie tins, classroom parties, or a cozy afternoon with hot cocoa.
Why You'll Love This Recipe
- Very easy and quick to make: active prep is about 15 minutes and baking is just 7 to 10 minutes per batch, so you can have dozens in under an hour.
- Nut-free but still traditional in texture: retains the classic melt-in-your-mouth crumb while making the cookie safe for nut-sensitive gatherings.
- Uses pantry-friendly ingredients you likely already have: butter, sugar, flour, vanilla, and mini chips get the job done.
- Great for make-ahead and gifting: cookies keep well in airtight tins for up to a week and freeze beautifully for months.
- Kid-friendly shaping and rolling: scoop, bake, and roll in powdered sugar — children can help with the simple steps.
In my own kitchen these cookies became the one treat every relative requests. I love how adaptable the dough is; I've swapped vanilla for almond or orange extract in other seasons and always come away delighted. They are also wonderfully portable — a single cookie tin has made many holiday visits easier and happier.
Ingredients
- Unsalted butter: 1 cup softened. Use a high-quality block butter like Land O'Lakes or Kerrygold when possible for a rich flavor and stable texture; stick butter gives the best structure compared with spreads.
- Powdered sugar: 1/2 cup plus extra for rolling. Confectioners sugar adds the classic snowy coating and melts to a satin finish on the cookie exterior.
- Vanilla extract: 1 teaspoon. Pure vanilla extract adds warmth and rounds the buttery flavor; you can substitute with other extracts for variation.
- All-purpose flour: 2 1/4 cups. Spoon and level the flour into the cup to avoid a dense dough — too much flour will yield dry cookies.
- Salt: 1/2 teaspoon. Balances the sweetness and enhances the butter's flavor.
- Mini chocolate chips: 1 cup. Mini chips distribute evenly through the dough without overpowering the delicate texture; use semi-sweet for classic contrast.
- Additional powdered sugar: About 1 cup for rolling. Ensure it is sifted if clumpy to get a smooth outer coating.
Instructions
Preheat and prepare:Preheat oven to 375 degrees Fahrenheit. Line two baking sheets with parchment paper to prevent spreading and promote even browning. If you prefer crisper bottoms, use insulated sheets, or rotate halfway through baking for even color.Cream the butter and sugar:In a stand mixer fitted with the paddle or with a hand mixer, beat 1 cup softened butter with 1/2 cup powdered sugar and 1 teaspoon vanilla until light and fluffy, about 2 to 3 minutes on medium-high. The aeration here creates a tender crumb; scrape the bowl once to ensure even mixing.Add dry ingredients:Sift or add 2 1/4 cups all-purpose flour and 1/2 teaspoon salt to the butter mixture. Mix on low until the dough just comes together. Overmixing develops gluten and yields a tougher cookie; stop as soon as the dough holds when pressed.Fold in chocolate chips and chill if needed:Use a spatula to stir in 1 cup mini chocolate chips. If the dough feels too soft to shape, chill it in the refrigerator for 15 to 30 minutes until firm enough to handle; chilled dough gives cleaner rounds and less spreading.Shape and bake:Scoop rounded tablespoon-sized balls of dough and arrange them spaced about 2 inches apart on prepared sheets. Bake 7 to 10 minutes until the bottoms are just slightly golden; the centers may still look pale — they will set as they cool.Roll in powdered sugar:Let cookies cool slightly until warm but not hot. Place about 1 cup powdered sugar in a small bowl and roll each cookie until fully coated; the sugar clings better while the cookie retains warmth. Transfer to a wire rack to cool completely, then roll again if you like a double-coating for a more dramatic snowball look.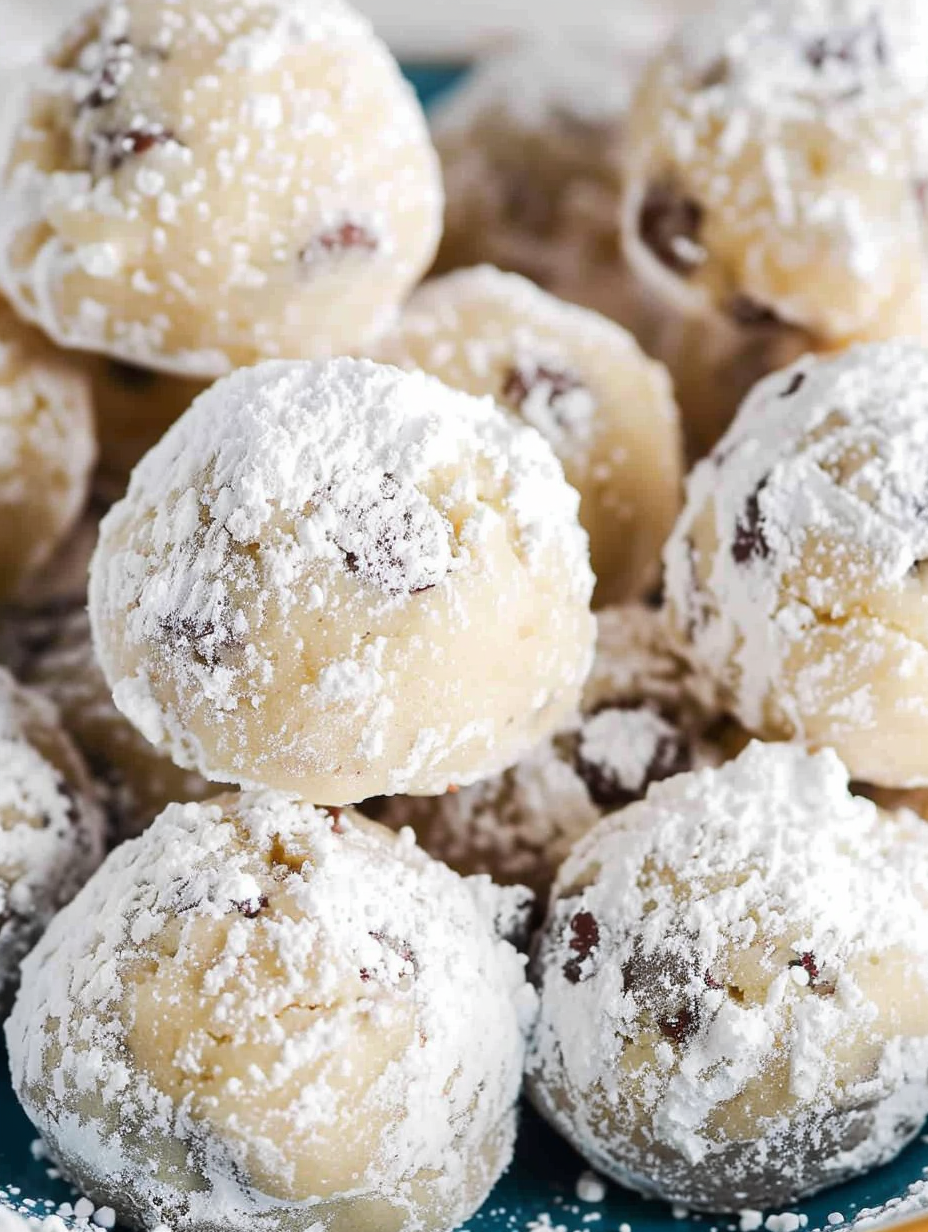
You Must Know
- These cookies are not suitable for a dairy-free or vegan diet because they contain butter; for a nut-free option this version omits nuts but always check chocolate chip packaging for cross-contamination warnings.
- Storage tip: keep cookies in an airtight container at room temperature for up to one week, or freeze baked cookies for up to three months. Thaw at room temperature before serving.
- Nutritional note: each cookie is about 79 calories with roughly 8 grams carbs and 5 grams fat. They are a light treat compared to many frosted holiday cookies.
- Mixing tip: this dough can take a little time to come together in a hand mixer — use a stand mixer with a paddle if you have one to save time and wrist effort.
My favorite thing about these is how the powdered sugar softens slightly after a day, creating a delicate sheen that makes every cookie look freshly dusted with snow. Family members often say these taste like a simpler, more elegant version of classic chocolate chip cookies, and the mini chips make them look festive without extra decoration.
Storage Tips
Store completely cooled cookies in a single layer separated by parchment or wax paper to prevent sticking and preserve shape. Keep them in an airtight container at room temperature for up to one week. For longer storage, freeze in a sealed container or freezer bag for up to three months; thaw at room temperature and re-roll in powdered sugar if needed to refresh the snowy appearance. If shipping tins, cushion cookies and avoid stacking too many layers to minimize breakage.
Ingredient Substitutions
If you need to adapt the recipe, swap the mini chocolate chips with finely chopped chocolate for a more intense cocoa flavor. To make these dairy-free, substitute 1 cup of vegan butter sticks formulated for baking; note texture differences and that some vegan butters yield slightly softer cookies. For a gluten-free version, use a 1-to-1 gluten-free baking blend, but be mindful that crumb texture may vary; chill longer if the dough feels fragile.
Serving Suggestions
Serve with hot chocolate, mulled cider, or a pot of strong coffee to balance the powdered sugar sweetness. For a festive platter, alternate these snowball cookies with ginger snaps, thumbprints, and shortbread. Garnish the plate with sprigs of rosemary or candied cranberries to create a seasonal presentation. They also make a lovely edible gift when stacked in a clear cello bag tied with ribbon.
Cultural Background
Snowball-style cookies appear across many culinary traditions, often called Mexican wedding cookies, Russian tea cakes, or butterballs, depending on the region and small variations in ingredients. The classic form usually includes chopped nuts; this version removes nuts in favor of chocolate chips to suit nut-free occasions while maintaining the signature tender, meltaway crumb that earned the cookie its many names.
Seasonal Adaptations
For winter holidays, replace vanilla with orange extract and stir in finely grated orange zest for a bright holiday twist. In summer, fold in lemon zest and white chocolate chips for a lighter flavor profile. For special occasions, press a single larger chocolate chip into the top of each cookie after baking and before rolling for a jewel-like garnish.
Meal Prep Tips
Make the dough up to 48 hours ahead and keep it refrigerated; scoop the dough onto a tray and freeze the individual portions. Transfer frozen dough balls to a freezer bag — bake from frozen, adding a minute or two to the bake time. This system gives you fresh-baked cookies on demand and is ideal for entertaining or last-minute gift preparation.
These snowball cookies have become a holiday staple at my house. They are simple, dependable, and always disappear fast. Try doubling the batch for parties — you will be glad you did. Happy baking and may your holidays be full of warmth and good company.
Pro Tips
Sift powdered sugar before rolling to avoid clumps and get a smooth coating.
Chill the dough for 15 to 30 minutes if it is too soft to shape; chilled dough spreads less in the oven.
Use a tablespoon cookie scoop for uniform cookies so they bake evenly.
If rolling warm cookies, do a light initial roll and then a second roll once completely cool for a whiter finish.
This nourishing chocolate chip snowball cookies recipe is sure to be a staple in your kitchen. Enjoy every moist, high protein slice — it is perfect for breakfast or as a wholesome snack any time.
FAQs about Recipes
Can I freeze these cookies?
Yes. These cookies freeze well. Freeze baked cookies for up to three months in an airtight container. Thaw at room temperature and roll again in powdered sugar if needed.
Do I need a stand mixer?
Use a stand mixer with the paddle attachment for fastest results. A hand mixer will work but plan for longer mixing times.
How do I get crisper cookies?
If you want crispier bottoms, bake on a dark sheet and watch closely near the end of the baking window. Remove when bottoms are just golden.
Tags
Chocolate Chip Snowball Cookies
This Chocolate Chip Snowball Cookies recipe makes perfectly juicy, tender, and flavorful steak every time! Serve with potatoes and a side salad for an unforgettable dinner in under 30 minutes.
Ingredients
Cookies
Instructions
Preheat and line sheets
Preheat the oven to 375 degrees Fahrenheit and line two baking sheets with parchment paper to prevent sticking and ensure even baking.
Cream butter and sugar
Beat 1 cup softened butter with 1/2 cup powdered sugar and 1 teaspoon vanilla until light and fluffy, about 2 to 3 minutes. Proper creaming traps air for a tender cookie.
Add flour and salt
Add 2 1/4 cups all-purpose flour and 1/2 teaspoon salt and mix on low until the dough just comes together; avoid overmixing to prevent toughness.
Fold in chips and chill if necessary
Stir in 1 cup mini chocolate chips. If the dough is too soft to handle, chill for 15 to 30 minutes until firm enough to scoop and shape.
Shape and bake
Scoop tablespoon-sized balls and place 2 inches apart on prepared sheets. Bake 7 to 10 minutes until the bottoms are slightly golden and centers set.
Roll in powdered sugar
While cookies are warm, roll them in about 1 cup powdered sugar until coated. Cool on a wire rack and roll again if you want a heavier coating.
Last Step: Please leave a rating and comment letting us know how you liked this recipe! This helps our business to thrive and continue providing free, high-quality recipes for you.
Nutrition
Did You Make This?
Leave a comment & rating below or tag
@velvetyum on social media!
Categories:
You might also like...

Cheesy Zucchini Rollatini
Tender grilled zucchini rolled with a basil-kissed ricotta filling, nestled in marinara, and baked until the mozzarella bubbles and turns golden.

Crispy Zucchini and Squash
Golden, garlicky rounds with a deep-fried crunch made lighter in the air fryer. A fast, vitamin-packed side everyone devours.

Chicken Parmesan Meatballs
Tender chicken meatballs simmered in marinara, finished with melted mozzarella and basil for cozy, weeknight Italian comfort in every bite.
Did You Make This?
Leave a comment & rating below or tag @velvetyum on social media!
Rate This Recipe
Share This Recipe
Enjoyed this recipe? Share it with friends and family, and don't forget to leave a review!
Comments (1)
This recipe looks amazing! Can't wait to try it.
Comments are stored locally in your browser. Server comments are displayed alongside your local comments.

Hi, I'm Emma!
What's Popular

30-Minute Meals!
Join to receive our email series which contains a round-up of some of our quick and easy family favorite recipes.