
Cherry Cheesecake Cookie Cups

Bite-sized cherry cheesecake cookie cups made with store-bought or from-scratch sugar cookie dough, a smooth cream cheese filling, and bright cherry topping — perfect for parties and quick treats.
This Cherry Cheesecake Cookie Cups recipe has been my go-to quick dessert whenever I need something that checks boxes for speed, taste, and crowd appeal. I first landed on this combination the week my neighborhood book club decided to bring potluck treats; I wanted something portable, tidy, and indulgent without spending the afternoon in the kitchen. The contrast of a crisp, slightly buttery cookie shell with a pillowy cream cheese filling and a bright, slightly tart cherry topping hooked everyone the first time. Since then, I've simplified the steps so you can assemble these in under an hour, including chilling time.
What I love most about these little cups is how forgiving they are. Use store-bought sugar cookie dough for a semi-homemade shortcut, or make the dough from scratch if you want that extra homemade flavor. The texture is a beautiful balance: a thin, crisp-edged cookie cup that holds a creamy, slightly tangy filling with a burst of cherry in the center. They are small but decadent — one is often enough to satisfy a sweet craving, but they’re tempting enough that guests often come back for more.
Why You'll Love This Recipe
- Ready in under an hour from start to finish (about 58 minutes including chill time); active work is only about 20 minutes.
- Flexible: works with store-bought sugar cookie dough for speed or from-scratch dough for a richer flavor.
- Perfectly portioned bite-size treats — ideal for parties, lunchboxes, or an elegant dessert platter.
- Uses pantry staples (butter, sugar, cream cheese) and a single can of cherry pie filling for bright color and flavor.
- Make-ahead friendly: assemble and refrigerate up to 12 hours for fuss-free entertaining.
- Customizable: swap cherries for raspberry preserves or use lemon curd for a citrus twist.
My family’s reaction when I first served these was immediate: the kids loved the little size and the adults kept commenting on how the cookie shell complemented the creaminess. Over time I learned a few tricks — like chilling the dough briefly if it’s soft and using a small scoop so each cup is uniform — and those small changes made a big difference in the final presentation.
Ingredients
- Store-bought sugar cookie dough: One standard 16-ounce package (or equivalent) — convenient and consistent in texture; Pillsbury-style refrigerated dough works well when pressed into the pan.
- Cream cheese: 8 ounces of full-fat cream cheese, softened to room temperature for a silky filling — Philadelphia-brand gives a reliably smooth texture.
- Vanilla: 1 teaspoon pure vanilla extract to round out the tang of the cream cheese and lift the overall flavor.
- Whipped topping: 1 cup thawed whipped cream topping (Cool Whip or homemade stabilized whipped cream) to lighten the filling without making it runny.
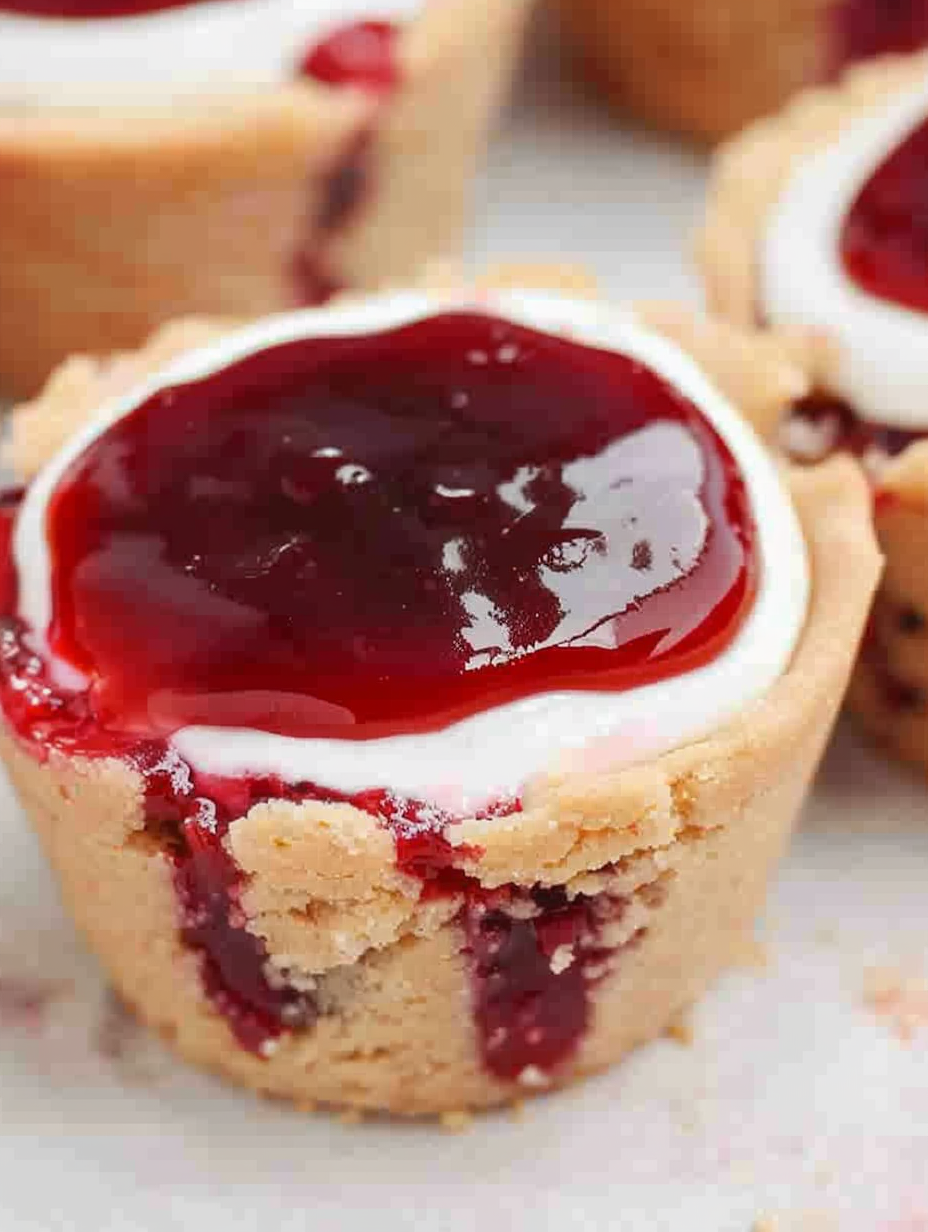
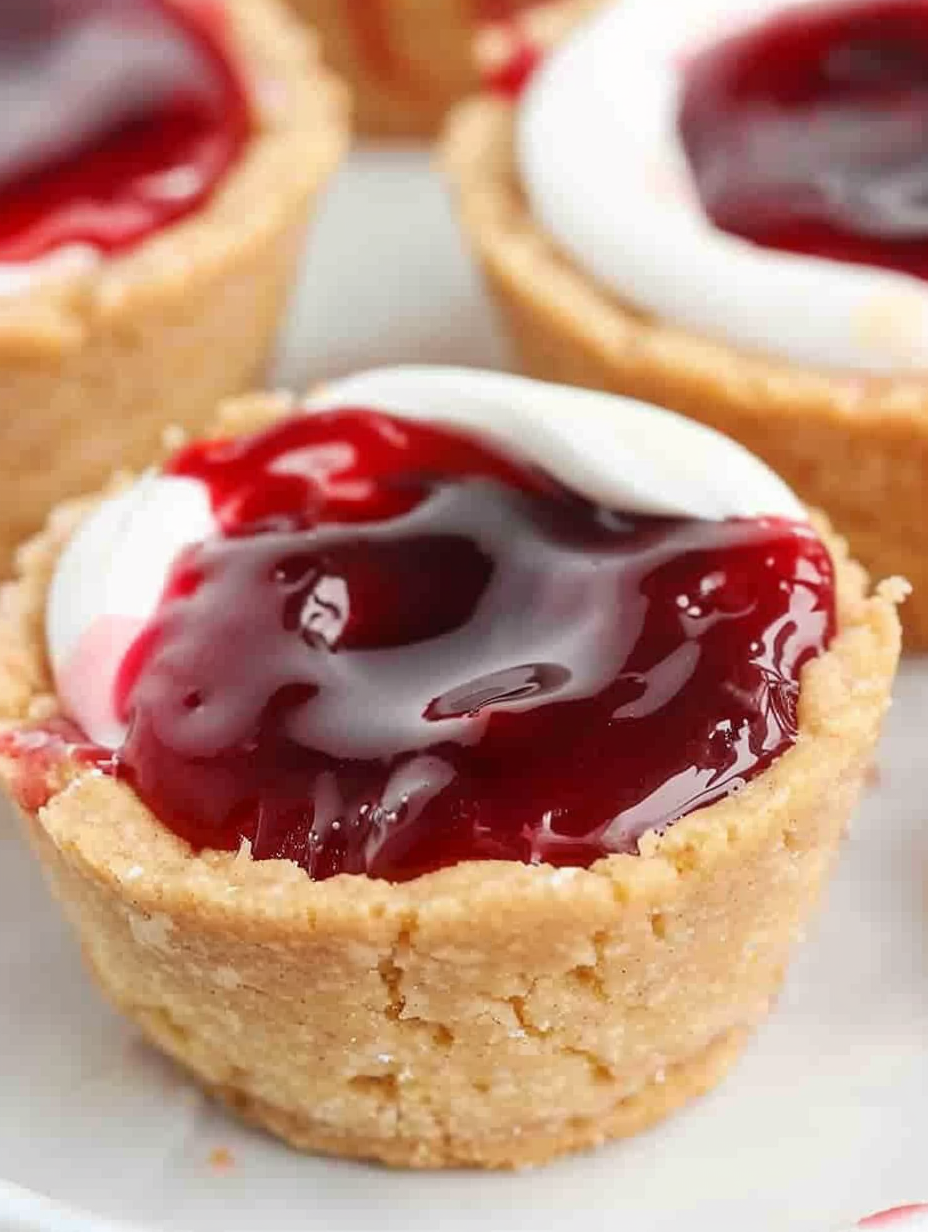
- Cherry pie filling: 1 can (about 21 ounces) cherry pie filling for vibrant color and tart-sweet flavor — use a brand you enjoy since it’s the visible topping.
- Chocolate sprinkles (optional): For garnish and added texture; optional, but they add a pretty contrast against the red cherries.
- From-scratch sugar cookie dough (optional): 3 cups all-purpose flour, 1 teaspoon baking powder, 1 cup (2 sticks) unsalted butter softened, 1 cup granulated sugar, 1 large egg, 1 teaspoon vanilla extract — for homemade cookie cups with a tender crumb.
Instructions
Preheat and prepare: Preheat the oven to 350°F. Grease a standard 12-cup muffin tin well, or use nonstick spray. If you’re using refrigerated dough, cut the tube into pieces about 1 to 1 1/2 tablespoons each; if using homemade dough, divide and roll as directed below. Greasing thoroughly ensures easy removal of the cookie cups after baking. Shape the cups: Press 1 to 2 tablespoons of cookie dough into each muffin well, starting with the center and working up the sides to form a cup shape. Aim for an even thickness (about 1/8 to 1/4 inch) so the cups bake uniformly. If using cold homemade dough, let it sit at room temperature for 5 minutes before shaping so it’s pliable but still firm. Bake until set: Bake for 8 to 12 minutes depending on the size of your tin and dough thickness. Look for edges turning a light golden brown while the center remains slightly pale — this gives a crisp edge and tender interior. Cool the cups in the tin for 10 minutes before carefully removing to a cooling rack to finish cooling. Prepare the filling: In a medium bowl, beat 8 ounces softened cream cheese with 1 teaspoon vanilla until smooth. Gently fold in 1 cup thawed whipped topping until fully combined and fluffy. Take care not to overmix — overbeating can make the filling overly airy or cause separation. Assemble the cups: Spoon 1 to 2 tablespoons of the filling into each cooled cookie cup, smoothing the top with the back of the spoon. Top each with approximately 1 tablespoon of cherry pie filling, letting a few cherries sit on top for visual appeal. Sprinkle chocolate sprinkles if desired. Chill and serve: Refrigerate the assembled cups for at least 30 minutes to let the filling set and the flavors meld. Serve chilled for the best texture; store leftovers in an airtight container in the refrigerator for up to 3 days.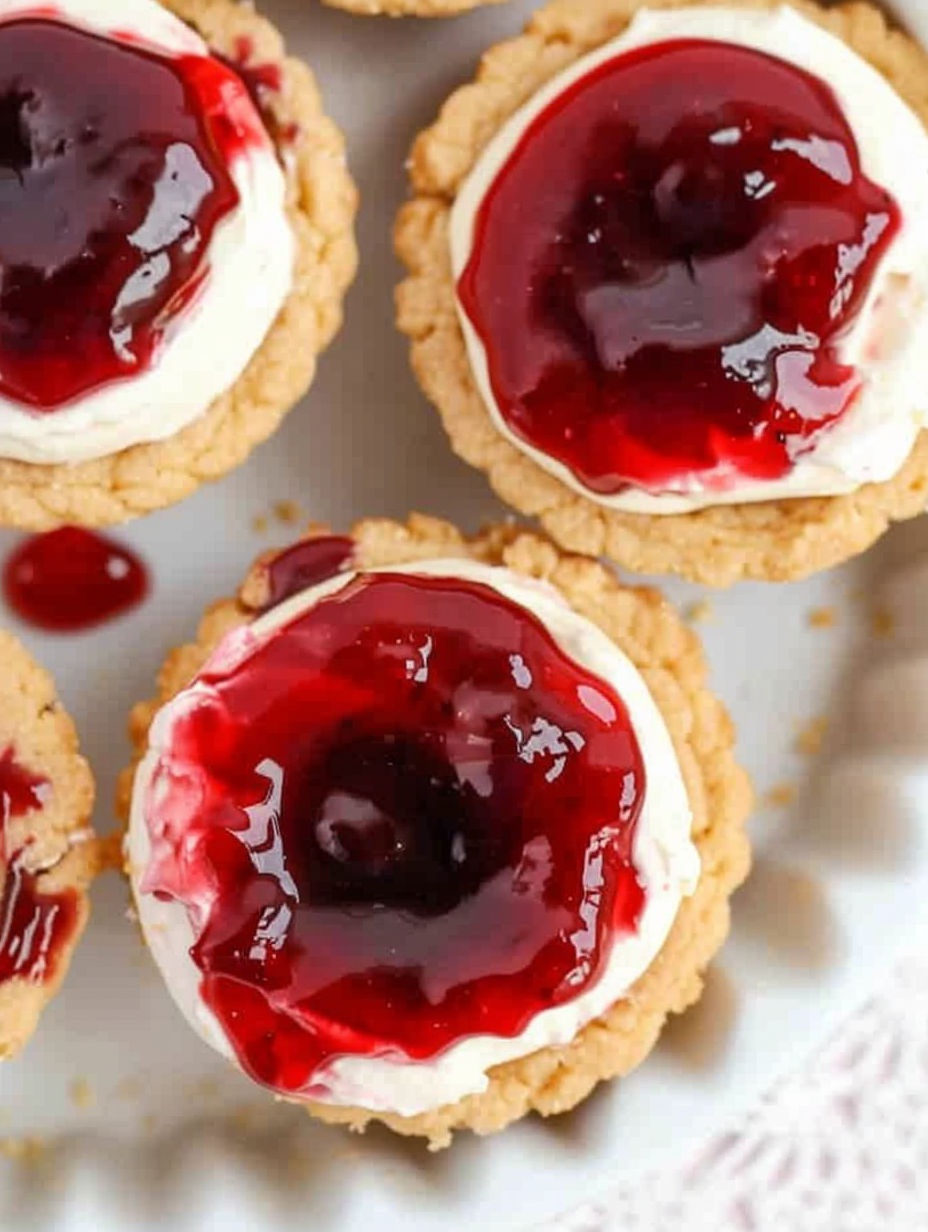
You Must Know
- These hold well in the refrigerator for up to 3 days; they also freeze (without sprinkles) for up to 1 month — thaw in the fridge before serving.
- High in calcium and moderate calories per bite; a single cup is a rich treat — portion control is easy thanks to the small size.
- Make-ahead tip: bake the cups a day ahead, cool completely, and store in an airtight container; fill the day you serve for freshest appearance.
- Best results come from full-fat cream cheese; reduced-fat versions can be used, but texture and flavor will be less creamy.
I adore the way these little cups feel like a mini dessert experience — each bite has texture contrasts that keep you reaching for the plate. One memorable time, I brought a tray to a summer potluck and neighbors kept asking for the recipe; they loved how portable and polished the cups looked, and how the cherry topping made them feel celebratory without fuss.
Storage Tips
Store assembled cups in a single layer in an airtight container and refrigerate; they’ll keep fresh for up to 3 days. If stacking is necessary, place parchment paper between layers to protect the topping. For longer storage, freeze unassembled baked cups for up to 1 month: cool fully, freeze in a single layer on a sheet tray, then transfer to a freezer-safe bag. Thaw in the refrigerator before filling. Reheat is not recommended for assembled cups; instead, let them come to serving temperature in the fridge and enjoy chilled.
Ingredient Substitutions
If you prefer a lighter filling, substitute part of the cream cheese with mascarpone (1:1) for a silkier texture, or use half cream cheese and half Greek yogurt for tang and protein (note: the filling will be less firm). For a gluten-free approach, use a certified gluten-free sugar cookie dough or make your own with a 1-to-1 gluten-free flour blend and add 1 tablespoon of xanthan gum for structure. Swap the cherry topping for blueberry pie filling or lemon curd for a bright citrus variation; reduce added sugar slightly if using sweet preserves.
Serving Suggestions
Present these cups on a decorative platter with a dusting of powdered sugar or a drizzle of melted dark chocolate. They pair beautifully with espresso or a late-afternoon tea. For a brunch buffet, set them beside fruit salad and mini quiches — they add a sweet finishing touch without overwhelming the table. Garnish with a fresh mint leaf or a few toasted almond slivers for texture and visual interest.
Cultural Background
Mini cheesecakes and tartlets have roots in European baking traditions where small, individual portions were favored for formal service. The concept of placing a creamy filling into a cookie or pastry shell is a natural evolution merging American cookie culture with classic tart techniques. Using canned pie filling is an American convenience innovation that became popular mid-20th century, making bright fruit toppings easily accessible year-round.
Seasonal Adaptations
In summer, use fresh macerated cherries or a homemade blueberry compote for a lighter, fresher topping. For fall and the holidays, swap cherries for spiced apple compote and add a pinch of cinnamon to the cookie dough. For Valentine’s Day, use heart-shaped mini tins or top with chopped chocolate-covered cherries to amp up the festive feel.
Meal Prep Tips
To streamline for entertaining, bake and cool all cookie cups the day before and keep them in a covered container. Prepare the filling in the morning and transfer to a piping bag for quick assembly right before guests arrive — piping gives a neat presentation and speeds up the process. Keep pie filling chilled until the moment of topping to preserve its glossy look.
These Cherry Cheesecake Cookie Cups are small in size but big on charm. They’re a recipe I turn to when I want something that looks special without a lot of effort. Make them your own — experiment with toppings, shapes, and garnish — and enjoy sharing these bite-sized moments with friends and family.
Pro Tips
Use a small cookie scoop for consistent cookie cup sizes — 1 to 1 1/2 tablespoons of dough per cup creates even results.
Soften cream cheese to room temperature for at least 30 minutes to avoid lumps in the filling.
Chill baked cups briefly before removing from the tin to prevent cracking; cool completely before filling.
If using chilled refrigerated dough, let it sit 5 minutes at room temperature so it’s pliable for shaping.
This nourishing cherry cheesecake cookie cups recipe is sure to be a staple in your kitchen. Enjoy every moist, high protein slice — it is perfect for breakfast or as a wholesome snack any time.
FAQs about Recipes
Can I freeze these ahead of time?
Yes. Bake the cookie cups, cool, freeze in a single layer, then transfer to a freezer bag. Thaw in the fridge before filling.
How do I keep the filling smooth and creamy?
Use full-fat cream cheese at room temperature and fold in whipped topping gently to avoid overmixing which can break the texture.
Tags
Cherry Cheesecake Cookie Cups
This Cherry Cheesecake Cookie Cups recipe makes perfectly juicy, tender, and flavorful steak every time! Serve with potatoes and a side salad for an unforgettable dinner in under 30 minutes.
Ingredients
Cookie Cups (store-bought)
From-Scratch Sugar Cookie Dough (optional)
Filling & Toppings
Instructions
Preheat and prepare
Preheat the oven to 350°F. Grease a 12-cup muffin tin well. If using refrigerated dough, portion into 1 to 1 1/2 tablespoon pieces. If using homemade dough, divide after chilling.
Shape cookie cups
Press 1 to 2 tablespoons of dough into each muffin well, forming even-thickness walls and a shallow bottom. Aim for approximately 1/8 to 1/4 inch thickness for uniform baking.
Bake and cool
Bake the cups for 8 to 12 minutes until edges are lightly golden and centers are set. Cool in the tin for 10 minutes, then transfer to a cooling rack to finish cooling before filling.
Prepare the filling
Beat 8 ounces softened cream cheese with 1 teaspoon vanilla until smooth. Fold in 1 cup whipped topping gently until combined. Do not overmix to maintain a creamy texture.
Assemble the cups
Spoon 1 to 2 tablespoons of filling into each cooled cup. Top with about 1 tablespoon cherry pie filling per cup and garnish with sprinkles if desired.
Chill before serving
Refrigerate assembled cups for at least 30 minutes to let the filling set. Store leftovers in an airtight container in the fridge for up to 3 days.
Last Step: Please leave a rating and comment letting us know how you liked this recipe! This helps our business to thrive and continue providing free, high-quality recipes for you.
Nutrition
Did You Make This?
Leave a comment & rating below or tag
@velvetyum on social media!
Categories:
You might also like...

Cheesy Zucchini Rollatini
Tender grilled zucchini rolled with a basil-kissed ricotta filling, nestled in marinara, and baked until the mozzarella bubbles and turns golden.

Crispy Zucchini and Squash
Golden, garlicky rounds with a deep-fried crunch made lighter in the air fryer. A fast, vitamin-packed side everyone devours.

Chicken Parmesan Meatballs
Tender chicken meatballs simmered in marinara, finished with melted mozzarella and basil for cozy, weeknight Italian comfort in every bite.
Did You Make This?
Leave a comment & rating below or tag @velvetyum on social media!
Rate This Recipe
Share This Recipe
Enjoyed this recipe? Share it with friends and family, and don't forget to leave a review!
Comments (1)
This recipe looks amazing! Can't wait to try it.
Comments are stored locally in your browser. Server comments are displayed alongside your local comments.

Hi, I'm Emma!
What's Popular

30-Minute Meals!
Join to receive our email series which contains a round-up of some of our quick and easy family favorite recipes.