
The BEST Triple Chocolate Cheesecake

Extra creamy, totally decadent triple chocolate cheesecake with an Oreo crust, silky chocolate filling and glossy ganache — a showstopper that's easier than it looks.
This cheesecake has been my signature dessert for years and is the ultimate indulgence for anyone who lives for rich chocolate. I discovered this combination during a holiday season when I wanted something impressive but achievable; the first time I served it, guests asked for the recipe before dessert was even finished. The texture is what sells it: an ultra-creamy center that holds a clean slice, a slightly chewy Oreo crust that gives you contrast, and a shiny ganache crown that adds a professional finish. Every bite delivers deep chocolate flavor with a velvety mouthfeel.
I usually make this for birthdays and dinner parties because it travels well and can be made a day ahead. The recipe balances semi-sweet and bittersweet chocolate so the sweetness is restrained while the cocoa intensity comes through. I learned a few key tricks the hard way — room-temperature eggs, low-speed mixing to avoid aeration, and a proper water bath — and those small steps make this reliably crack-free and silky every time. If you want a dessert that reads luxe but is surprisingly straightforward, this will be your new go-to.
Why You'll Love This Recipe
- Decadent triple-layer chocolate experience: Oreo crust, semi-sweet chocolate filling and a bittersweet ganache for balanced sweetness and deep cocoa notes.
- Make-ahead friendly: the texture improves after chilling overnight, and it stores well for parties — ready in about 5 hours 25 minutes total when factoring chill time.
- Uses pantry staples and accessible chocolate: semi-sweet for the filling and bittersweet for the ganache; no specialty ingredients required.
- Reliable technique: water bath and low-speed mixing reduce cracking and over-aeration, delivering a smooth, dense texture that slices cleanly.
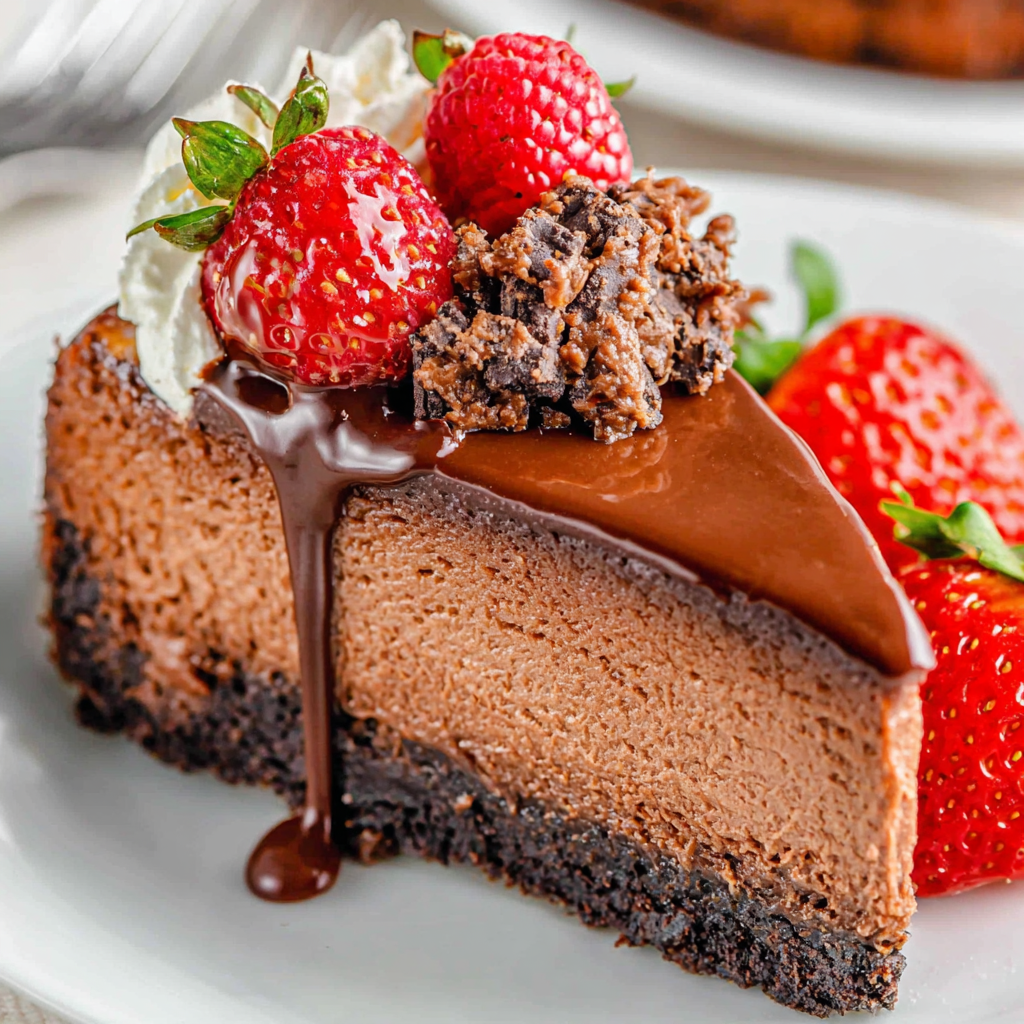
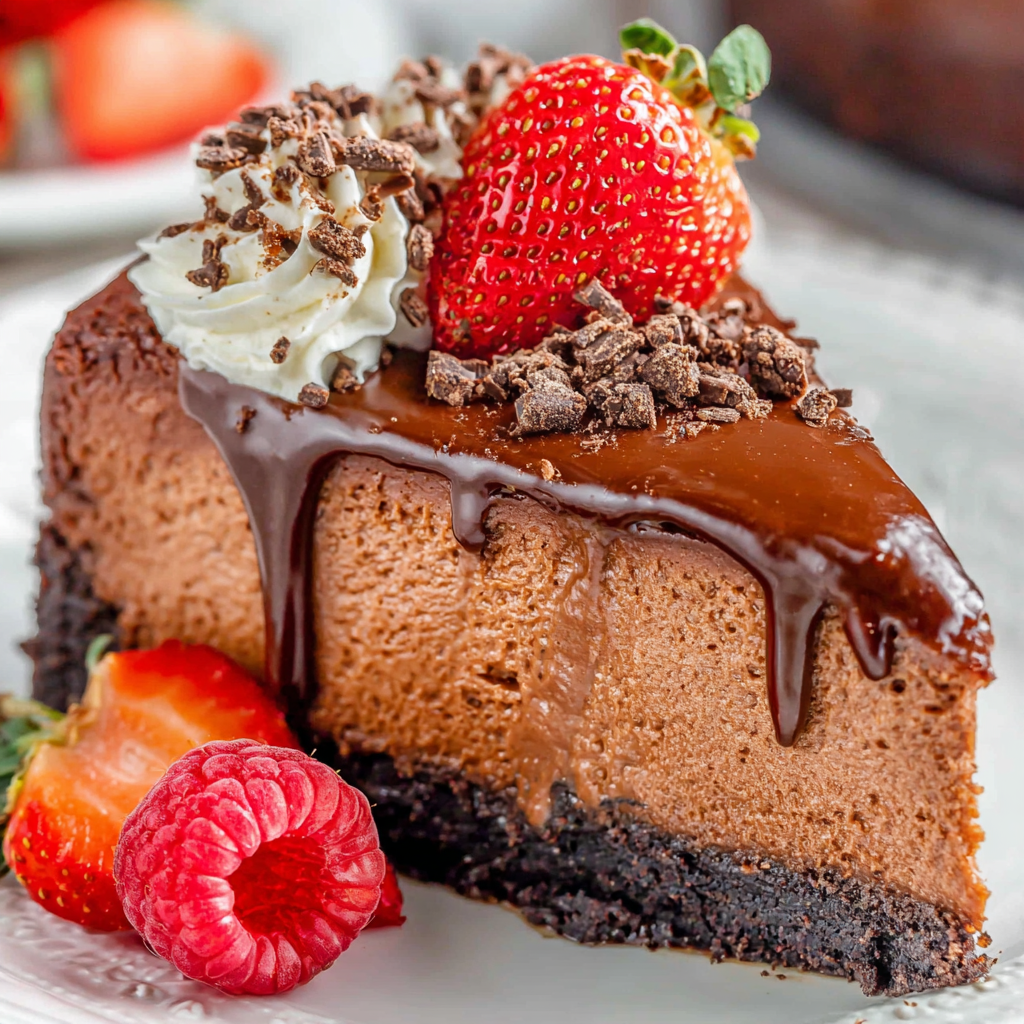
- Customizable for presentation: pipe a whipped ganache border, add fresh berries, or chocolate shavings for dramatic plating suitable for holidays or special events.
- Feeds a crowd: makes 16 generous slices, ideal for gatherings and celebrations.
Personally, my family lights up when I bring this out. One year I made it for a potluck and an uncle who claims not to like sweets went back for thirds. It’s the sort of recipe that creates memories — the aroma of melting chocolate and warm cream, and the moment someone says, "This is the best cheesecake I've ever had."
Ingredients
- Oreo crust: Use 18 standard Oreo cookies (filling included) crushed to fine crumbs and combined with 4 tablespoons melted salted butter. The classic Oreo gives a slightly sweet, chocolatey base with a hint of cream; I prefer Nabisco Original for consistent texture.
- Semi-sweet chocolate: 8 ounces chopped semi-sweet chocolate melted for the filling. Choose a good quality block chocolate (60% cocoa) for smooth melting and intense flavor — Ghirardelli or Scharffen Berger are dependable.
- Cream cheese: 32 ounces (four 8-ounce packages) at room temperature for easy beating and a lump-free finish. Full-fat cream cheese gives the best texture and richness.
- Sugar & sour cream: 1 cup granulated sugar to sweeten and 1/4 cup sour cream to add moisture and a subtle tang that brightens the chocolate.
- Flour & vanilla: 2 tablespoons all-purpose flour stabilizes while 1 teaspoon vanilla extract enhances complexity without overwhelming the chocolate.
- Eggs: 4 large eggs at room temperature incorporated one at a time to keep the batter cohesive without introducing excess air.
- Ganache topping: 8 ounces chopped bittersweet chocolate and 1 cup heavy whipping cream for a glossy, firm finish; use chocolate with 70% cocoa for a sophisticated edge.
- Optional garnishes: fresh strawberries, raspberries, whipped chocolate ganache, and chocolate shavings for texture and color contrast.
Instructions
Prepare the pan and water bath: Preheat oven to 325°F. Wrap a 9-inch springform pan in two layers of heavy-duty aluminum foil to prevent leaks. Lightly spray the pan with nonstick spray. Place a folded kitchen towel in the bottom of a large roasting pan to stabilize the springform pan when assembling the water bath later. Make the Oreo crust: Process 18 Oreo cookies in a food processor until they become fine crumbs. Add 4 tablespoons melted salted butter and pulse until the mixture resembles wet sand. Press the crumbs into the bottom and about 1 inch up the sides of the prepared springform pan using the bottom of a glass to compact evenly. Bake for 10 minutes and allow to cool while preparing the filling. Melt the filling chocolate: Place 8 ounces semi-sweet chocolate in a microwave-safe bowl and heat at 50% power in 30-second increments, stirring between each until melted and smooth. Let cool slightly so it is warm but not hot when added to the batter. Beat cream cheese and sugar: In a large bowl or stand mixer fitted with the paddle, beat 32 ounces room-temperature cream cheese with 1 cup granulated sugar on low speed until very smooth and well combined. Low speed prevents overworking the cheese and introducing air. Add sour cream, flour, and vanilla: Mix in 1/4 cup sour cream, 2 tablespoons all-purpose flour, and 1 teaspoon vanilla extract on low speed until incorporated. These ingredients add stability and a silkier mouthfeel. Incorporate chocolate and eggs: Add the melted semi-sweet chocolate to the cheese mixture and beat on low until uniform. Add the 4 large eggs one at a time, mixing just until blended after each addition to avoid adding air. Scrape the bowl as needed to ensure uniform texture. Fill pan and bake in water bath: Pour the batter into the cooled crust and smooth the surface with an offset spatula. Gently tap the pan on the countertop to release air bubbles. Place the springform on the folded towel in the roasting pan and carefully pour hot water into the pan until it reaches about halfway up the sides of the springform. Bake 60 to 70 minutes until the center registers 150°F and is almost set. Cool and chill: Turn off the oven and crack the door open slightly, allowing the cheesecake to cool in the oven for 1 hour to minimize temperature shock. Remove and run a knife around the rim to loosen, then cool at room temperature for another hour. Wrap tightly and refrigerate at least 4 hours or overnight for best texture. Make the ganache: Place 8 ounces chopped bittersweet chocolate in a heat-proof bowl. Bring 1 cup heavy whipping cream to a simmer (watch carefully). Pour hot cream over the chocolate and let stand 5 minutes. Stir until smooth and glossy, then cool 20 minutes before pouring over chilled cheesecake. Finish and serve: Remove the cheesecake from the fridge and remove the springform rim. Pour ganache starting in the center and stop before the edge or allow drips for a rustic look. Chill 20 to 30 minutes until ganache is set. Garnish with berries, chocolate shavings or piped whipped ganache if desired, then slice and serve.
You Must Know
- This contains dairy, eggs and gluten; store tightly covered in the refrigerator for up to 5 days.
- Freeze without ganache for up to 2 months; thaw in the refrigerator overnight and add ganache before serving.
- Chilling overnight improves texture and flavor melding; the cheesecake slices cleaner when cold.
- Using a water bath and low-speed mixing reduces cracking and prevents a grainy texture, delivering a glossy, dense center.
My favorite part is the balance between textures: the crumbly Oreo base and the satin chocolate interior. One holiday I doubled the recipe and the leftover slices disappeared so quickly I wondered if guests were sneaking pieces throughout the night. This dessert always brings a sense of occasion to a simple family dinner.
Storage Tips
Store leftover slices in an airtight container in the refrigerator for up to five days; separate layers with parchment to prevent sticking. For longer storage, freeze the cheesecake before adding the ganache: wrap tightly in plastic wrap followed by foil and place into a freezer-safe container for up to two months. Thaw in the fridge overnight. When reheating single slices, allow them to come to room temperature for 20 minutes for optimal texture — never microwave for long, as it will alter the structure.
Ingredient Substitutions
If you prefer a nutty twist, substitute half the Oreo crumbs with finely chopped toasted pecans or graham cracker crumbs for a less intense chocolate base. For a less sweet version, use 70% cocoa semi-sweet chocolate for the filling and 72% for the ganache. To make it gluten-free, use gluten-free chocolate sandwich cookies or a gluten-free chocolate cookie and verify all ingredient labels; note texture will be slightly different. For a lighter texture, replace half the sour cream with full-fat Greek yogurt.
Serving Suggestions
Serve slices at room temperature or slightly chilled with fresh berries and a scoop of vanilla ice cream for contrast. A dusting of cocoa powder or edible gold flakes elevates presentation for special occasions. Pair with a robust coffee, espresso or a dessert wine like a tawny port to complement the chocolate depth. For a festive centerpiece, pipe a whipped ganache rosette border and scatter chocolate shavings and seasonal berries on top.
Cultural Background
Cheesecake has a long history dating back to ancient Greece, and modern American-style cheesecakes evolved to feature rich dairy and baking techniques. The combination of chocolate with cheesecake is a relatively modern adaptation that leverages chocolate’s global appeal and the creamy base of the dessert. Oreo cookies, invented in 1912, became a popular crust choice in the late 20th century for their sweet, chocolatey crunch and convenience, creating the beloved Oreo-crusted chocolate cheesecake we enjoy today.
Seasonal Adaptations
In summer, top with fresh raspberries and a light whipped cream to add acidity. For the holidays, fold a teaspoon of espresso powder into the batter for depth and garnish with candied orange peel. Valentine’s Day is perfect for heart-shaped slices and piped rosettes; fall gatherings benefit from a splash of bourbon in the ganache for warmth. Adjust garnishes seasonally to highlight fresh produce and complementary flavors.
Meal Prep Tips
Make the crust and filling a day ahead and bake the cheesecake in the morning to allow it to cool gradually. Chill overnight and add the ganache the next day for a quick finish before serving. Use individual springform pans for portable mini cheesecakes that are perfect for parties — reduce bake time accordingly and monitor center temperature to 150°F. Store slices in single-serve containers for grab-and-go desserts.
This cheesecake is a true crowd-pleaser: decadent, dependable and elegant. With a few kitchen tricks and good chocolate, you can make a dessert that feels restaurant-quality at home. I hope you make it for someone special and enjoy the same joyful reactions my family always does.
Pro Tips
Use room-temperature cream cheese and eggs to ensure a smooth batter and avoid lumps.
Mix on low speed and add eggs one at a time to minimize air bubbles and prevent cracking.
Use a water bath to regulate oven temperature and reduce the chance of split tops.
Cool the cheesecake slowly by leaving it in the warm oven with the door cracked to prevent sudden temperature changes.
This nourishing the best triple chocolate cheesecake recipe is sure to be a staple in your kitchen. Enjoy every moist, high protein slice — it is perfect for breakfast or as a wholesome snack any time.
FAQs about Recipes
Can I freeze this cheesecake?
Yes. Wrap the cheesecake tightly (without ganache) in plastic and foil and freeze for up to 2 months. Thaw in the refrigerator overnight and add ganache before serving.
How do I know when the cheesecake is done?
The center is done when it registers 150°F and is slightly jiggly. Avoid overbaking to keep it creamy.
Tags
The BEST Triple Chocolate Cheesecake
This The BEST Triple Chocolate Cheesecake recipe makes perfectly juicy, tender, and flavorful steak every time! Serve with potatoes and a side salad for an unforgettable dinner in under 30 minutes.
Ingredients
Oreo Crust
Chocolate Filling
Ganache Topping
Optional Garnishes
Instructions
Prepare pan and water bath
Preheat oven to 325°F. Wrap a 9-inch springform pan in two layers of heavy-duty aluminum foil and lightly spray. Place a folded towel in the bottom of a large roasting pan to stabilize the springform for the water bath.
Make the Oreo crust
Pulse 18 Oreos in a food processor to fine crumbs. Add 4 tablespoons melted salted butter and pulse until combined. Press into the bottom and 1 inch up the sides of the springform and bake 10 minutes. Cool while preparing filling.
Melt chocolate for filling
Melt 8 ounces semi-sweet chocolate in a microwave-safe bowl at 50% power in 30-second bursts, stirring between each, until smooth. Cool slightly before adding to batter.
Beat cream cheese and sugar
Beat 32 ounces softened cream cheese with 1 cup sugar on low speed until smooth. Add 1/4 cup sour cream, 2 tablespoons flour and 1 teaspoon vanilla and mix until incorporated.
Combine chocolate and eggs
Mix in the melted chocolate on low speed. Add 4 room-temperature eggs one at a time, mixing until just combined to avoid adding air.
Bake in a water bath
Pour batter into crust, smooth and tap to release air. Place springform on the towel in the roasting pan and carefully add hot water halfway up the pan sides. Bake 60–70 minutes until center reads 150°F.
Cool and chill
Turn off oven and crack the door; cool in oven 1 hour. Remove, run a knife around the rim, cool at room temperature 1 hour, then wrap and refrigerate at least 4 hours or overnight.
Prepare ganache
Place 8 ounces chopped bittersweet chocolate in a bowl. Bring 1 cup heavy cream to a simmer, pour over chocolate and let sit 5 minutes. Stir until smooth and cool 20 minutes before pouring.
Finish and serve
Remove springform rim, pour ganache starting in the center, stop before the edge or allow drips. Chill 20–30 minutes until set, garnish as desired and slice.
Last Step: Please leave a rating and comment letting us know how you liked this recipe! This helps our business to thrive and continue providing free, high-quality recipes for you.
Nutrition
Did You Make This?
Leave a comment & rating below or tag
@velvetyum on social media!
Categories:
You might also like...

Cheesy Zucchini Rollatini
Tender grilled zucchini rolled with a basil-kissed ricotta filling, nestled in marinara, and baked until the mozzarella bubbles and turns golden.

Crispy Zucchini and Squash
Golden, garlicky rounds with a deep-fried crunch made lighter in the air fryer. A fast, vitamin-packed side everyone devours.

Chicken Parmesan Meatballs
Tender chicken meatballs simmered in marinara, finished with melted mozzarella and basil for cozy, weeknight Italian comfort in every bite.
Did You Make This?
Leave a comment & rating below or tag @velvetyum on social media!
Rate This Recipe
Share This Recipe
Enjoyed this recipe? Share it with friends and family, and don't forget to leave a review!
Comments (1)
This recipe looks amazing! Can't wait to try it.
Comments are stored locally in your browser. Server comments are displayed alongside your local comments.

Hi, I'm Emma!
What's Popular

30-Minute Meals!
Join to receive our email series which contains a round-up of some of our quick and easy family favorite recipes.